Press “play” to begin, then move through the slides below.
Press “play” to begin, then move through the slides below.
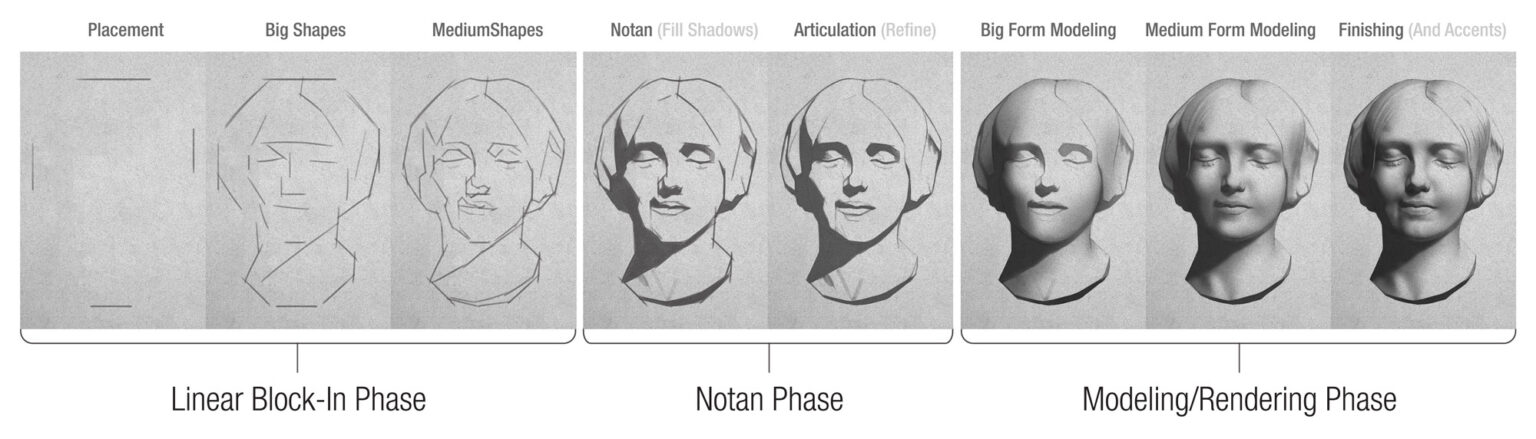
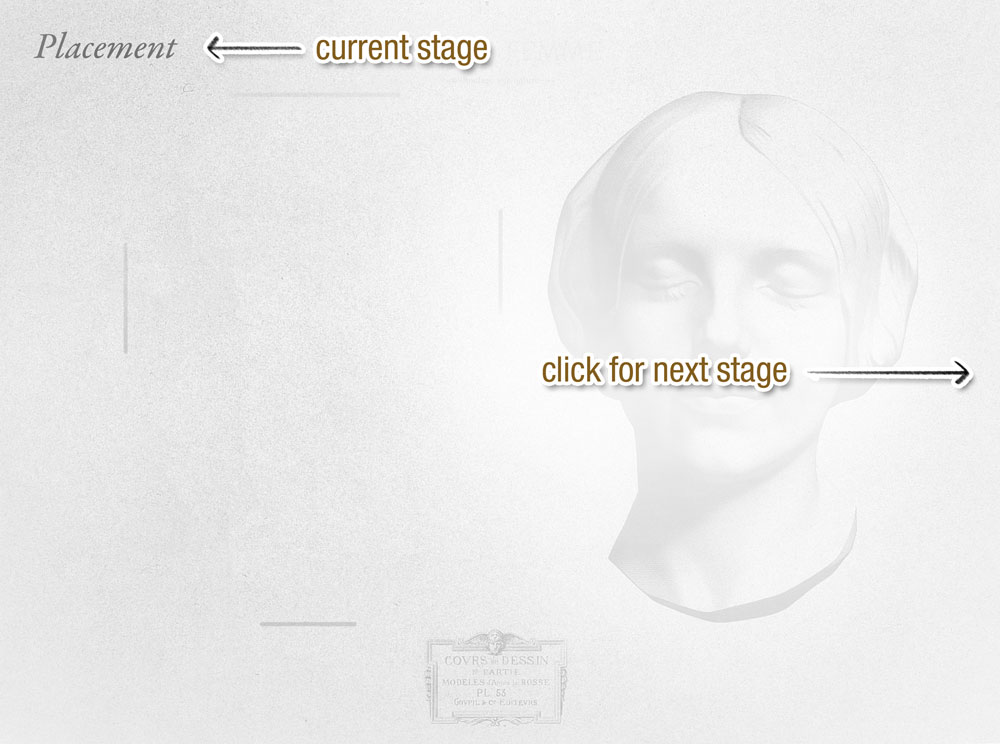
Stage 1: Placement
Draw marks for the top, bottom, left, and right extremes of your subject. Keep your lines light. Correct the drawing until you are satisfied with the relationship between height & width. Check that there is a comfortable amount of space between these marks and the edges of the paper. Adjust the placement if necessary.
This stage is complete when you are happy with the placement of your subject on the page.
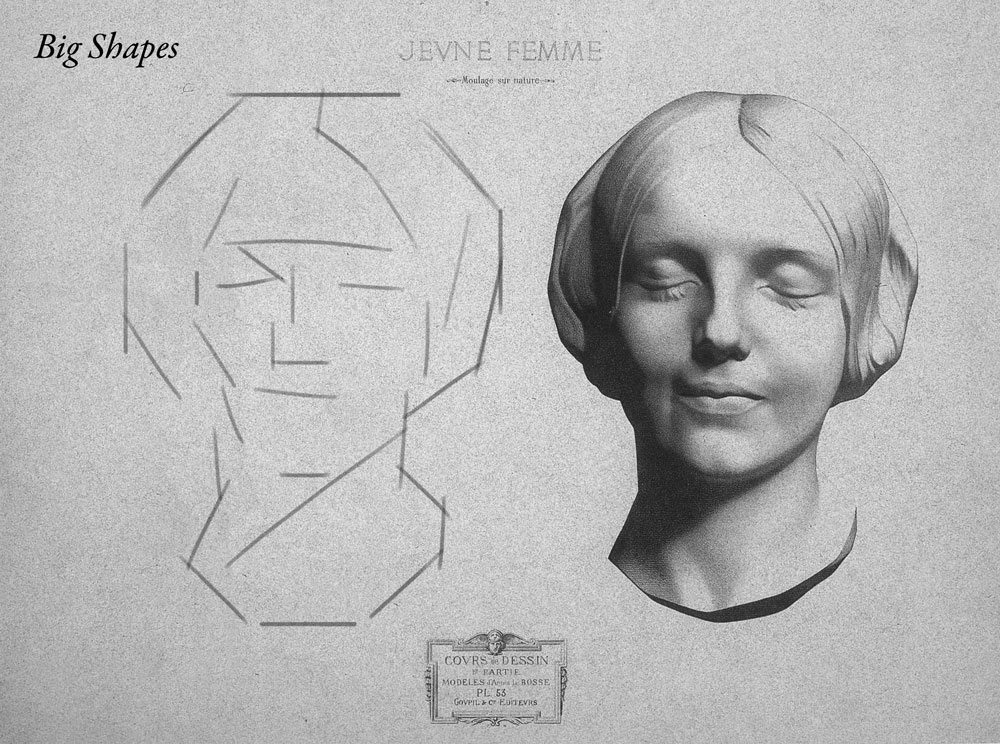
Stage 2: Big Shapes
As you continue, follow this one rule: draw the biggest line first. Be careful, you may be tempted to draw shorter lines. After you draw a line, you may also be tempted to continue with an adjacent line. Don’t do it! Step back. Look at the whole drawing. Identify the biggest line. Draw that. Stop when you have enough information in your drawing that a small child could understand it. Now stay at this level of abstraction (big shapes only) and refine the proportions. This is the foundation, let’s get all the big lines in the right place before moving on.
This stage is complete when you are confident about the proportions of these big shapes.
Stage 3: Medium Shapes
Once you are happy with the big shapes, it’s time to add more information. Still follow the maxim of “drawing the biggest line first”. Stop when you feel that you are getting into small details. Stay at this level of abstraction and once again, reassess and correct your proportions. (Check out the Accuracy Guide for tips on how to get proportions right.)
This stage is complete when you are confident about the proportions of these medium-size shapes.
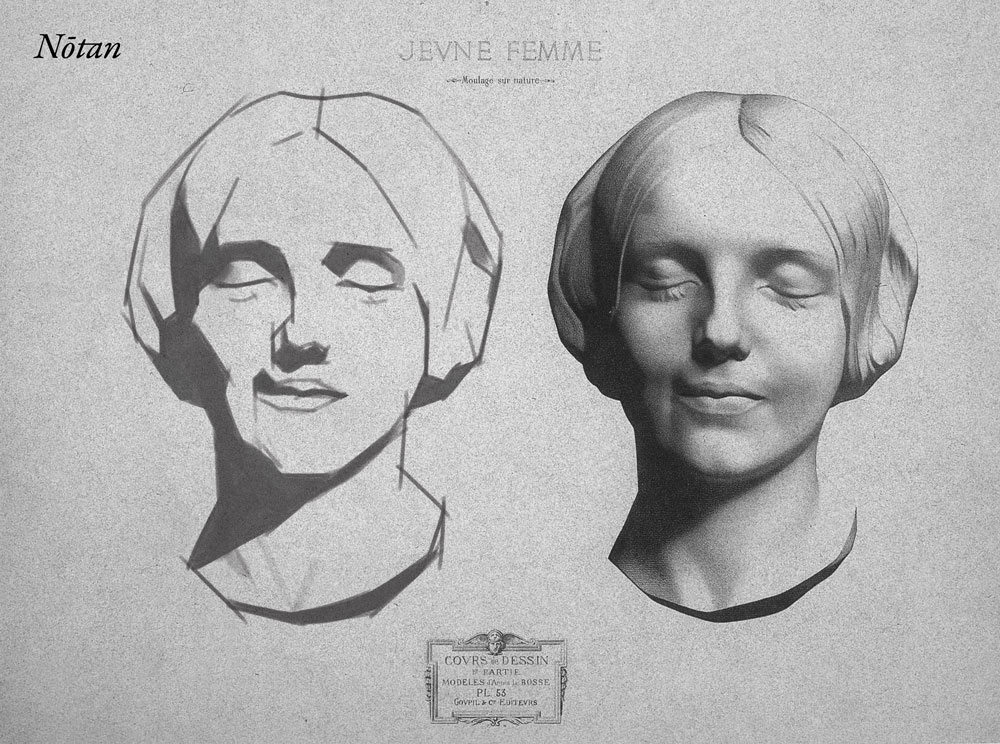
Stage 4: Nōtan
For the Nōtan stage, apply a uniform tone to all shadows. This will let you see the contrast between light shapes and shadow shapes, making it much easier to compare the drawing and the subject and find proportional mistakes. ☝️ Important: all halftones belong to the light family and they should not be toned in at this point, especially if you don’t have much experience yet. If you’re not sure about how to distinguish halftones and shadows, watch this video.
This stage is complete when all shadows have an even tone and you’ve corrected proportional mistakes.
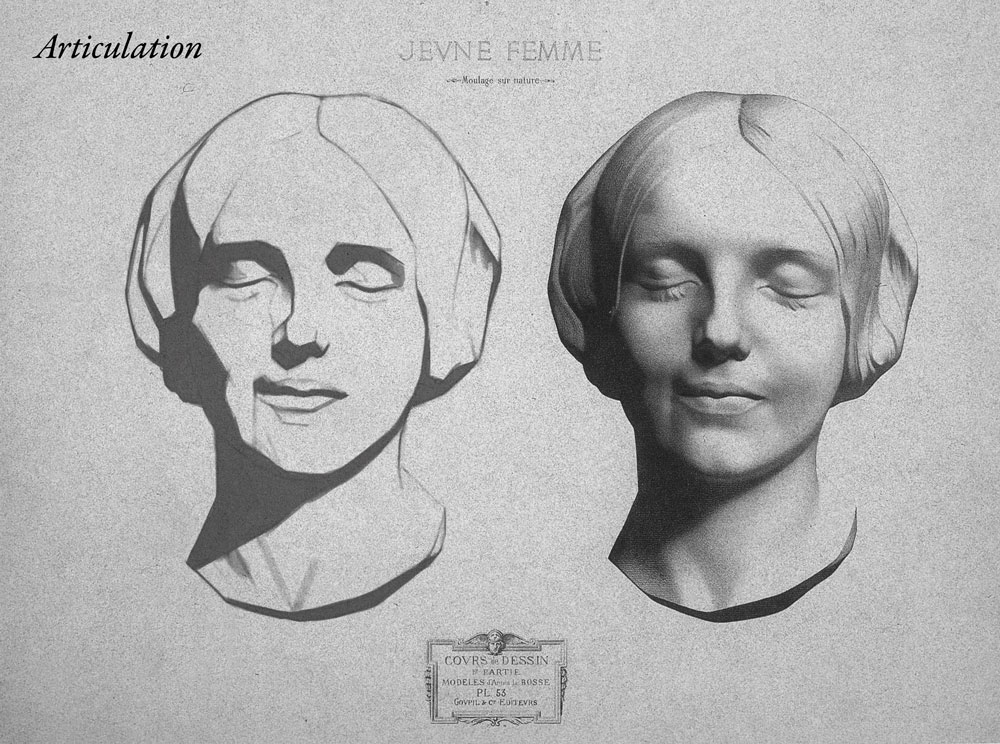
Stage 5: Articulation
Articulating a drawing means making it specific. We bring the “medium shapes” to the next level of development, expressing more subtleties of shape and line. The tones remain flat at this stage.
This stage is complete when the shapes/proportions in your drawing are accurate throughout.
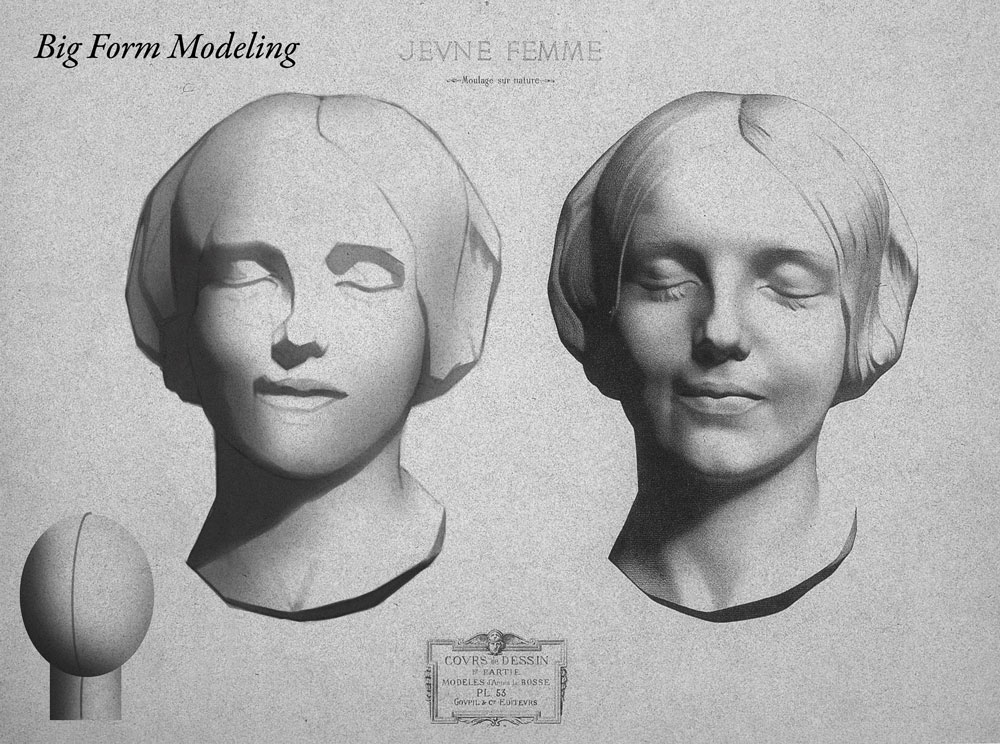
Stage 6: Big Form Modeling
Now we’re moving into shading/rendering. Shift your thinking from flat/2D shape to round/3D form. Think of your subject as a collection of underlying geometric forms. Here I see the head as an egg and the neck as a cylinder. This is the shading I apply. Sacrifice details to establish the big forms convincingly. You can introduce major soft edges/transitions at this stage.
This stage is complete when the big forms have a convincing sense of volume.
Stage 7: Medium Form Modeling
Just like we moved from big shapes to medium shapes, we are now sculpting medium forms that are embedded in the big forms. Examples of medium forms here are the cheeks, the chin, or the eye balls. Now is the time to capture more of the subtlety about how soft or firm the transitions are at the terminator.
This stage is complete when the drawing looks done, except for the final touches.
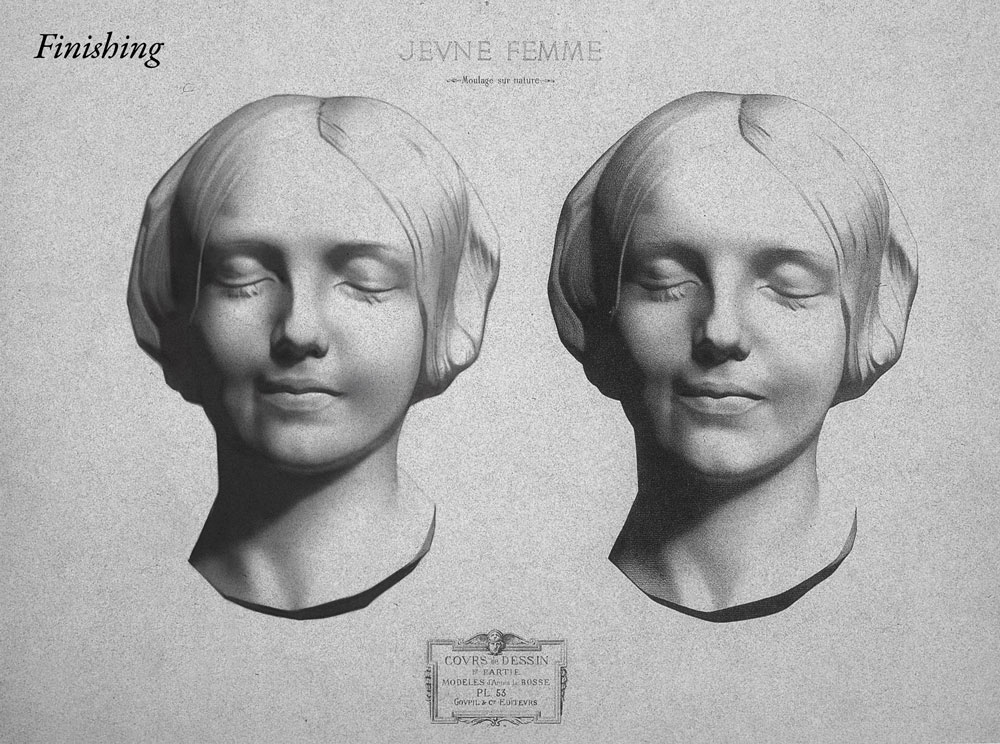
Stage 8: Finishing
An effective way to finish a drawing like this is to define areas and finish one area at a time. Begin with the most important focal point and bring this area to a complete finish. Then choose the second most important area and finish that. Picking smaller areas is better than larger areas. Finish each area completely before you move on. Get a friend or teacher who has more experience than you to give you feedback and suggestions for refining the image further. If you want to learn, explore refining the drawing beyond your comfort zone to gradually increase the level of finish you are capable of achieving.
About the author...
Dorian Iten
Artist & teacher. Former program director at Barcelona Academy of Art. Learn more atwww.dorian-iten.com/about.
learn more
If you enjoyed this...
…check out the Accuracy Guide! It’s a compact video course on getting proportions right.
This website uses cookies to improve your experience while you navigate through the website. Out of these, the cookies that are categorized as necessary are stored on your browser as they are essential for the working of basic functionalities of the website. We also use third-party cookies that help us analyze and understand how you use this website. These cookies will be stored in your browser only with your consent. You also have the option to opt-out of these cookies. But opting out of some of these cookies may affect your browsing experience.
Necessary cookies are absolutely essential for the website to function properly. This category only includes cookies that ensures basic functionalities and security features of the website. These cookies do not store any personal information.
Any cookies that may not be particularly necessary for the website to function and is used specifically to collect user personal data via analytics, ads, other embedded contents are termed as non-necessary cookies. It is mandatory to procure user consent prior to running these cookies on your website.